

Allows visualization, control, and scheduling of your home through the mobile app, locally or remotely.
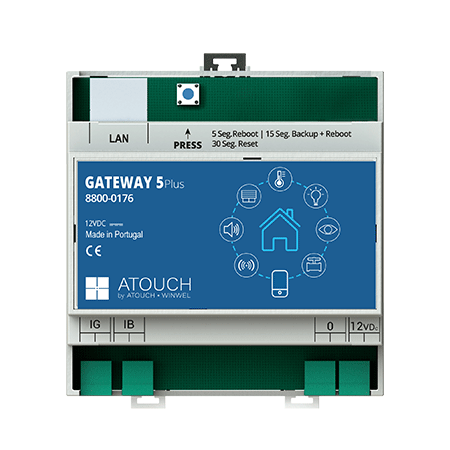
The D-GATEWAY5 Plus is the module responsible for communication with Atouch devices through mobile phones, tablets, web, and other IP devices in your home.
It supervises the dedicated BUS and the distributed intelligence of all modules, storing the basic configuration of the application, including rooms, devices, schedules, and other advanced features.
Both models offer the same functionalities and control for Atouch equipment. However, the D-GATEWAY5 PLUS stands out for being faster, more stable, and having greater memory capacity compared to the D-GATEWAY5.
Both models offer the same functionalities and control for Atouch equipment. However, the D-GATEWAY5 PLUS stands out for being faster, more stable, and having greater memory capacity compared to the D-GATEWAY5.
To access the D-GATEWAY5 Plus, install the Atouch 5.0 app and add a new home.
When accessing the Gateway page, the discovery process for the D-GATEWAY5 Plus on the network will begin.
Once your D-GATEWAY5 Plus IP appears, select it to add it to your app.
From that point on, you’ll be able to log in and configure your devices as desired.
The app is focused on controlling your Atouch devices.
To access the D-GATEWAY5 Plus through the Web, enter the IP address of the D-GATEWAY5 Plus in your browser’s search bar.
Then, log in to access, configure, and use your Gateway.
The Web page is focused on configuring your D-GATEWAY5 Plus and controlling devices.
To access the D-GATEWAY5 Plus through the Web, enter the IP address of the D-GATEWAY5 Plus in your browser’s search bar.
Then, log in to access, configure, and use your Gateway.
The Web page is focused on configuring your D-GATEWAY5 Plus and controlling devices.
To access your D-GATEWAY5 Plus remotely, you will need to:
Generate a DNS for remote access.
Open the following ports on your router:
80 – Unsecured port;
443 – Secure port using the Atouch DNS protocol;
4065 – Port used for technical support of the D-GATEWAY5 Plus.
To access your D-GATEWAY5 Plus remotely, you will need to:
Generate a DNS for remote access.
Open the following ports on your router:
80 – Unsecured port;
443 – Secure port using the Atouch DNS protocol;
4065 – Port used for technical support of the D-GATEWAY5 Plus.
Access the D-GATEWAY5 Plus Web page by entering its IP or DNS into the browser and log in.
Then go to Settings > Network.
Activate the DNS and click Register.
Next, choose a name that will be used for your remote access.
Access the D-GATEWAY5 Plus Web page by entering its IP or DNS into the browser and log in.
Then go to Settings > Network.
Activate the DNS and click Register.
Next, choose a name that will be used for your remote access.
The process of opening ports on your router varies depending on the device used. You will need to access your router and open ports 80, 443, and 4065 for the D-GATEWAY5 Plus public IP.
For more detailed information, consult your internet provider.
The process of opening ports on your router varies depending on the device used. You will need to access your router and open ports 80, 443, and 4065 for the D-GATEWAY5 Plus public IP.
For more detailed information, consult your internet provider.
When you open the D-GATEWAY5 Plus for the first time, it should already be programmed by the installer, so this process may not be necessary.
If not, follow the learning process to add Atouch devices.
On the Web page:
Log in to your D-GATEWAY5 Plus and go to Settings.
Under Gateway, click on Learn Installation.
On the mobile app:
Log in to your D-GATEWAY5 Plus and go to Settings.
Under General Gateway Commands, click on Learn Home.
This process may take a few minutes, depending on the number of installed devices.
On the Web page:
Log in to your D-GATEWAY5 Plus and go to Settings.
Under Gateway, expand the Installed Modules section and scroll to the bottom.
Click the Module Backup button.
On the mobile app:
Log in to your D-GATEWAY5 Plus and go to Settings.
Under General Gateway Commands, click on Backup Modules.
This ensures you have a backup of all your programming and can restore it when needed. The restore button is always next to the Backup button.
You can make a backup whenever you want. We recommend doing it at the following times:
When the installer completes the home setup;
After making significant changes to the names or key associations;
Before any technical intervention that might require restoring the previous state.
You can make a backup whenever you want. We recommend doing it at the following times:
When the installer completes the home setup;
After making significant changes to the names or key associations;
Before any technical intervention that might require restoring the previous state.
Access the Web page of the D-GATEWAY5 Plus by entering its IP or DNS in your browser and logging in.
Then go to Settings > System.
Click the Backup button to download a file with all D-GATEWAY5 Plus data.
Access the Web page of the D-GATEWAY5 Plus by entering its IP or DNS in your browser and logging in.
Then go to Settings > System.
Click the Backup button to download a file with all D-GATEWAY5 Plus data.
You can back up whenever you wish.
We recommend doing so:
Before and after updating the D-GATEWAY5 Plus software;
Before any technical intervention that might require restoring D-GATEWAY5 Plus data.
You can back up whenever you wish.
We recommend doing so:
Before and after updating the D-GATEWAY5 Plus software;
Before any technical intervention that might require restoring D-GATEWAY5 Plus data.
On the Web page, next to the Backup button, there is a Restore button.
Click it, and you’ll be prompted to upload a file. Select the file downloaded during the backup.
If you need to recover lost data but don’t have a backup file, contact Atouch support.
On the Web page, next to the Backup button, there is a Restore button.
Click it, and you’ll be prompted to upload a file. Select the file downloaded during the backup.
If you need to recover lost data but don’t have a backup file, contact Atouch support.
Access the Web page of the D-GATEWAY5 Plus by entering its IP or DNS in your browser and logging in.
Then go to Settings > Gateway.
Check if Updates shows Up-to-date or Update.
If Update appears, click the button to download and proceed with the update.
Access the Web page of the D-GATEWAY5 Plus by entering its IP or DNS in your browser and logging in.
Then go to Settings > Gateway.
Check if Updates shows Up-to-date or Update.
If Update appears, click the button to download and proceed with the update.
The D-GATEWAY5 Plus button has three functions, depending on how long you press it:
5 seconds – Performs a Soft Reboot, restarting only D-GATEWAY5 Plus services.
15 seconds – Performs a Hard Reboot, restarting the D-GATEWAY5 Plus entirely.
30 seconds – Performs a Factory Reset, erasing all stored information on the D-GATEWAY5 Plus.
Warning: Make a backup before performing a Factory Reset.
To restore factory settings, press the D-GATEWAY5 Plus button for 30 seconds.
Doing so will erase all current configurations, including schedules, names, learned devices, room compositions, etc.
However, the names of each output, security zones, and associations between keypads and outputs will not be lost, as they are stored in the output modules.
On the Web page:
Log in to your D-GATEWAY5 Plus and go to Settings > Network.
Change the IP field to the new desired address.
On the mobile app:
On the login page of your D-GATEWAY5 Plus, press the “+” button to open your Gateways.
Press the “+” again to access the list of D-GATEWAY5 Plus on the network.
In the list, press the Pencil icon next to the current IP.
This opens a page where you can change the internal IP of your D-GATEWAY5 Plus.
Warning:
– Make sure to choose an IP within your router’s range.
– Choose an IP in the private IP range of your router to avoid conflicts with other devices.
– If you change the IP, reconfigure the ports on the router.
If the house is new, it should already have been pre-configured by the installer.
You just need to download the Atouch 5.0 app and add the D-GATEWAY5 Plus.
If the house is new, it should already have been pre-configured by the installer.
You just need to download the Atouch 5.0 app and add the D-GATEWAY5 Plus.
Yes, to use the new Atouch 5.0 app, you’ll need the new D-GATEWAY5 or D-GATEWAY5 PLUS.
Yes, to use the new Atouch 5.0 app, you’ll need the new D-GATEWAY5 or D-GATEWAY5 PLUS.
No, the new D-GATEWAY5 Plus only supports access through the Atouch 5.0 app.
No, the new D-GATEWAY5 Plus only supports access through the Atouch 5.0 app.
The default IP is 192.168.1.189.
The default IP is 192.168.1.189.
Yes. To pair the D-GATEWAY5 Plus with smart hubs, access the D-GATEWAY5 Plus via IP or DNS and log in.
In the main menu, select Smart Home Integrations.
Generate the QR Code to be scanned by your Hub’s app. This allows you to control your Atouch smart home through other apps such as Alexa, Google Home, Apple Home, Samsung SmartThings, and more.
Subscribe to our newsletter and receive news, tips and offers Atouch
Apoio ao cliente

